Dungeons
Dungeons can be found around the Palpagos Islands. They hold some unique Pals and at least one Alpha Pal. You can find several chests throughout the dungeon as well as two guaranteed chests at the end.
Dungeons come in tiers, with each dungeon type having a different pool of Alpha Pals. At the end of each dungeon is one guaranteed Alpha version of a Pal.
There is a bug which occurs where, if the boss Pal isn't the type you want, you can walk about one and a half rooms away then return and it will be replaced with another from the same Dungeon pool. It is possible to find Alphas during times of day they are not normally available.
Currently, Dungeons are the only spawn location where ![]() Killamari can be found.
Killamari can be found.
After 200 mins whether you complete a dungeon or not it will reset and move to a new location.
The end game Dungeons appear to be a good location for farming Legendary Accessories. On top of that, killing or capturing the final boss gives nearly twice as much experience as one would get from capturing the non-dungeon variant. For the early game, the dungeons tend to contain large deposits of Paldium which is extremely helpful if the dungeon is close to a Fast Travel point.
Dungeon Layouts
Dungeons use one of a select few layouts. Based on which rooms you encounter after the entrance, it is trivial to determine which direction the boss is located in.
Exploring the Dungeon
There are a few handy tips that can be used when exploring the dungeons:
- Leaving a cheap and disposable item in the rooms you have already explored, such as a Paldium Fragment, can be a very helpful means of navigation.
- Bringing a fast and small ground mount will trivialize your traversal of the dungeons. Currently the best Pal for the job is Fengelope, which has the ability to double-jump. For those who plan to do a lot of dungeon exploring, it is suggested to breed a Fengelope with any combination of Swift, Runner, and Legend Passive Skills, as these will give 20%, 20%, and 15% movement speed respectively.
- It is quite common for there to be a passage that is flooded with water before the boss room. Whilst not every flooded passage is the correct way, it is more likely to be than other passages.
Pal Encounters
Dungeon Final Chest Loot
It appears that you can obtain all possible accessories and schematics from Treasure Chest. Furthermore, the Alpha Pal boss has a chance to drop accessories as well.
| Dungeon | Level | Loot |
|---|---|---|
| Hillside Cavern | 13 | |
| Isolated Island Cavern | 13 | |
| Ravine Grotto | 19 | |
| Mountain Stream Grotto | 29 | |
| Cavern of the Dunes | 38 | Emerald, Innovative Tech Manual, Rare Skill Fruit, Thermal Undershirt +1, Life Pendant +1, Pendant of Diligence +1 |
| Volcanic Cavern | 40 | Emerald, Innovative Tech Manual, Refined Metal Armor Schematic 1, Refined Metal Helm Schematic 1, Assault Rifle Schematic 2, Rare Skill Fruit, Uncommon Skill Fruit, Life Pendant +1 |
| Sacred Mountain Cavern | 45 | Diamond, Pal Metal Armor Schematic 1, Pal Metal Armour Schematic 2, Pal Metal Armour Schematic 3, Pal Metal Helmet Schematic 1, Assault Rifle Schematic 1, Rocket Launcher Schematic 1, Future Tech Manual, Rare Skill Fruit, Epic Skill Fruit, Defense Pendant +2, Heat Resistant Undershirt +2, Thermal Undershirt +2, Pendant of Diligence +2, Pendant of Diligence +1, Life Neck +2, Rocket Launcher Schematic 4, Cold Resistant Pal Metal Armour Schematic 1, Cold Resistant Pal Metal Armour Schematic 2, Ring of Dragon Resistance +1, Attack Pendant +2, Ring of Resistance |
| Cherry Blossom Cave | ? |
History
- 0.3.1.0
- Added Cherry Blossom Caves.
- 0.1.5.1
- Fixed an issue where the innermost door would not open after defeating the boss of a random dungeon.
- 0.1.2.0
- Introduced.
Media
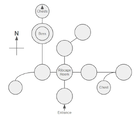
Example of possible dungeon layout.
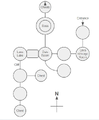
Example of possible dungeon layout.
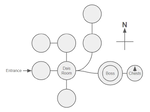
Example of possible dungeon layout.
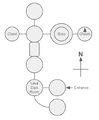
Example of possible dungeon layout.


